Posts

Showing posts from May, 2018

Using Ready-made Popsockets and Decorating it Your Way

Image
Hey Everyone, Popsockets is something that has been in style quite recently. And to be honest, they are pretty handy. Helps you hold your phone with a lot of ease, and you can even keep it on the desk to watch something on your phone. Today’s blog will teach you how you can make yourself a very crafty popsocket. With such cheap and affordable plain popsockets in the market, you can grab yourself a few plain colored popsockets, and paint them the way you like it. Today’s blog will give you major guidelines on how you can paint them and how you can make them look more arty. Step 1: Once you have a plain colored popsocket, you need to detach the top of the popsocket very carefully. This is the part you will be painting, so it needs to be removed from the body of the popsocket to help you paint it better and with more ease. Step 2: Paint it away. You can use acrylics for the best results.   More than the paints, I feel it is the way you use those paints that def
DIY Paper Plates Crafts

Image
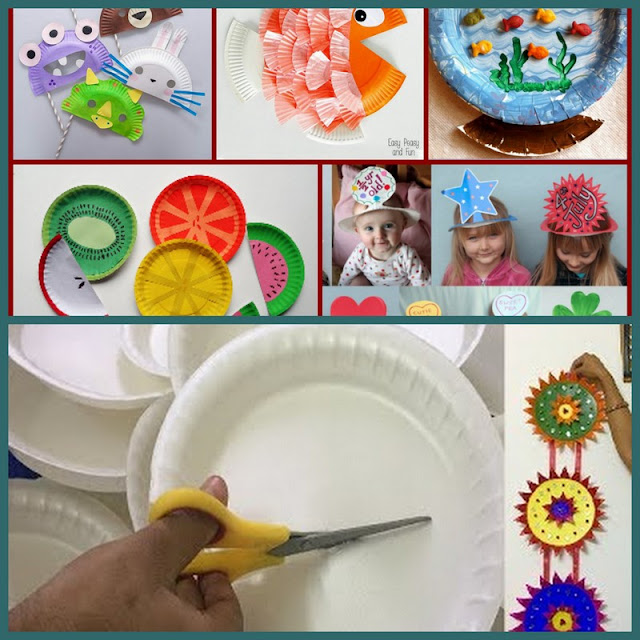
Hey Everyone, Hope you all are doing amazing today. Today’s blog is a blast from my past. Using paper plates to make these really adorable wall hangings. I still remember how much I enjoyed learning this DIY craft at school. It is an easy DIY craft. Easy to make, easy to purchase and easy to use. You can paint this in so many ways. Your children would love this DIY craft. And if you yourself are making it, you can also enjoy it and use it efficiently for decorating your classroom/ or DIY craft room for that matter. The things that you need for this DIY craft are: * Paper plates. In any shape and size. Need a pair of two each if      you want to make something different * Paints * Brushes * Crepe paper * Thread * The basics (glue, basic stationary, scissors) * Stapler * Punching machine Step 1: Take two plates of the same size. Cut one of the plates in halves. Make sure you cut it from the center as this part of the plate would b

DIY Customized Pencils

Image
Hey Everyone, Hope you all are doing amazing today. Today, I am going to teach you how to customize your pencils. It is a very easy craft. You can make it with pretty much anything available at home. I will mention the list of things that could be used to customize your pencils. For starters, you can get pencils which do not have any coating over them. Plain wooden pencils can be used easily for this DIY craft. The things you can use to cover up the pencil according to your choice are: ·          Markers ·          Tissue paper ·          Thread ·          Glitter These are the four main ideas that I have in mind which could be used to make your pencils amazing! Markers can be used directly on the pencil. You can do a graffiti and make your pencil colorful with so many designs. That is the easiest out of the four. Using tissue paper to make a customized pencil: 1.        Draw whatever pattern you have in mind on a tissue paper with a

DIY Money Box: Easy and Cheap

Image
Hey Everyone, Hope you all are doing superb today. Today, I am going to share a DIY that I made when I was young. A tin money box, made by you and for yourself. Saving money is easier when you have these different places with different money boxes.   Making a money box for yourself could be the easiest DIY I have known. Well, all DIY crafts are easy. So let’s take a look on how you can use a tin box to make money boxes. Things that you would need: A tin. Small sized. You can use the tins you get for frozen foods which have a plastic or rubber cover over it. Paints( spray paints and acrylics) The basics Step 1: Wash the tin or clean it with wet tissues. You don’t want any residue of the eatables which were inside the tin to avoid rusting and insects eating your money. Step 2: Spray paint a nice thick layer of paint in and out of the tin. Choose a base color for starters. And make sure the paint dries completely before you do anything else

DIY Bookmark: Easy and quick

Image
Hey Everyone, Hope you all are doing amazing today. So I tried this really cool thing with something as simple as a paper, some color pencils and tape. Yes, that is it. I needed something as a bookmark instantly, and I didn’t have the time to got to s shop and buy one. Neither did I have the fancy stuff to make my bookmark all fancy. So I chose simple, quick, easy and long lasting as an option. The things that I used to make this simple book mark are: Paper, any color would do. I used a pastel shade, however, it doesn’t really matter what color you choose as you are going to cover it up with colors, whether you use color pencils or paints. Glue, to thicken the paper. Color pencils. It is up to you how you want to paint or color your bookmark. And some scotch tape/duct tape. This is used to keep the colors safe and so that the bookmark doesn’t tear off. Step 1: Fold the paper, or any sheet which you are using according to the length of the book th

Bottle Crafts

Image
Hey Everyone, Hope you all are doing amazing today. Bottle art is one of the easiest arts and craft that you can do. Also, it is one of the best ways to recycle your plastic or glass bottles and make something useful and beautiful out of it. For today’s DIY tutorial, I am going to help you explore the different ways in which you can use bottles to make decoration pieces, wall hangings or even flower vases. It is easy. The things that you might need for this DIY are: Empty glass or plastic bottles. I would prefer glass bottles as they look more sleek. But if you have plastic bottles, you can use those as well. Paint. For glass bottles, it is better if you have glass paint. However, acrylics can do the work too. Acrylic paints can also be usable for plastic bottles. So whichever is available utilize that first. The basics: glue, scissors, pencil, eraser, sharpener, cutter, and a scale. Idea 1: GOING DIRECT If you want to go directly on the g

Popsicle Stick Vase

Image
Hey Everyone, Today’s blog is a superb idea for you to use all the popsicle sticks that you have collected. And even if you haven’t previously collected them, you can collect those now because I am sure all of the readers out here love eating popsicles. You can make so many crafts with popsicle sticks, but for today, we are going to learn how to make a popsicle sticks stand/ vase which can be used as a pen organizer on the desk or can be used to keep flowers on the table. Either way, we are making a small sized vase for the table. It is up to you how you want to use it. If you like it, you can even use it on your dressing table to keep your entire make up in it. Step 1: Paint all the popsicle sticks that you have. You can paint them with acrylics or poster paints; it is your own choice. If you don’t want to keep them simple, you can add glitter to the paint or dip the sticks in glitter with glue to add the spark. Another amazing idea would be to paint different

All About DIY Cards

Image
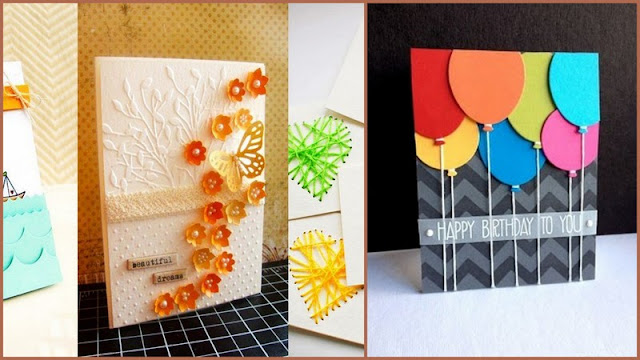
Hey Everyone, Hope you all are doing amazing today. Today we are going to talk about how to make different cards and how we can make it easy for us. Cards are something that we are taught from the very beginning of our educational learning. We, as kids, make cards for our parents, our siblings and even our grandparents when we are small. But that is not the only time you can make a care. Now that you are a teenager or even if you are a grown up, you can make some high quality cards which will have the same emotions attached to it. So first, let’s talk about what materials could be used to make a card. My favorite is the pastel sheet as it has this amazing texture on it which give your coloring/sketching a simply perfect card for your loved ones. So the basic paper that you can use is : Pastel sheet. There are a number of varieties in pastel sheets with different grains on them. So you can choose whether you want the ones with more grains to add more texture o

Pom Pom Bookmarks

Image
Everyone, Hope you all are doing amazing today. So in one of my recent blogs, I taught you how to make a pom pom with yarn or any thread. In today’s blog, we are going to use those pom poms with a slight alteration to make a pom pom book mark for you. This will be an exciting DIY craft for all the book worms out there who love to read and who love to make their own bookmarks.   For this DIY craft, you would need: Yarn Glue scissors The basics (pencil, eraser, rubber and sharperner) And that is about it! To be honest, there is never one way of making a certain craft. You as a DIY- maker, can alter the techniques as you like to make things easier for yourself. Similarly, the videos link that I will share today uses a very different way of making a pom pom. You can either use that technique, or use the fingers or a fork to make the pom pom. The steps are the same.  You wrap the yarn of your favorite color around the fork or your fingers

Large Flowers with Chart Paper

Image
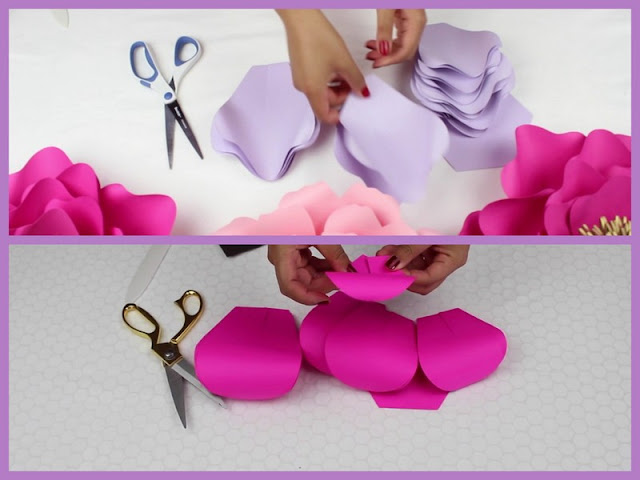
Hey everyone, Hope you all are doing amazing today. Today, I am going to talk about DIY flowers, which by the way is my favorite DIY of all times. Why? Because it is very easy to make, very easy to use for SO many things, and is so affordable for anyone as it only uses paper and glue. Yes, it is that cheap to purchase. Besides, you can use these as center pieces for tables, as backdrops, you can use this to decorate your party hall and pretty much anything. You can even make these at a small scale and use it for a hairband. The ideas are unlimited. If you love DIY crafts, then you are going to love this. Disclaimer: None of the videos shared on today’s blog belong to the Crafty Blogger and we do not take any credit for the creativity displayed by the amazing video bloggers. Their efforts and ideas must be appreciated. All you need for this DIY craft: Chart paper in different colors Glue Some crepe paper to make the center part of the flower Scissors, penci

Tassel Earrings

Image
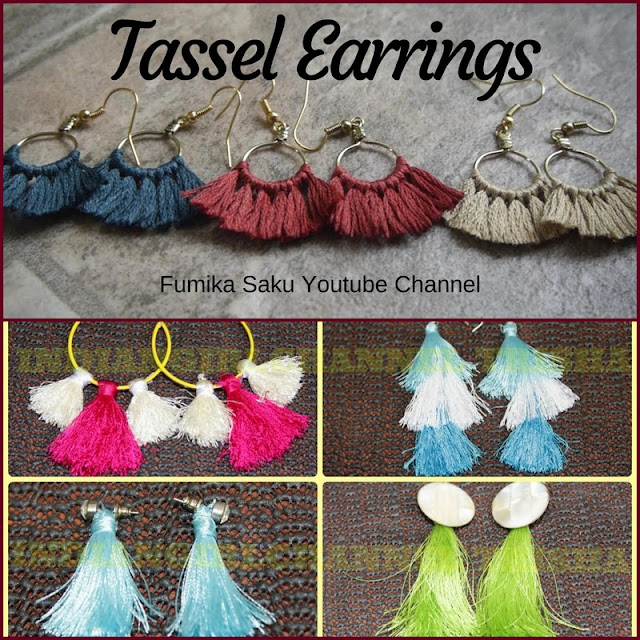
Hey Everyone, Hope you all are doing amazing today. Today, we are going to learn a type of earring which is super inn these days and can give your overall outfit a perfect touch. Tassel earrings. Tassel earrings are so easy to make and can be made under a very limited budget. A few things that you might need for this DIY craft are: ·           Old hoop earrings. You can even buy new ones as they won’t cost you a lot.   The earring hooks to make different styles of tassel earrings other than the hoop.   Beautiful colors of thread. Silk thread would be the best for this DIY as it adds a little shine to the earrings and makes them look very formal-ish. You can also use embroidery thread if you like. It will cost you cheaper in comparison to the silk thread.   The basics for every DIY crafts; scissors, glue and maybe some tape. Now there are so many types of tassel earrings you can make. 1.        Hoop tassel earrings 2.        Earring hook tassel earrings 3.