Posts

Showing posts from March, 2018

DIY Stationary Pouch/ Case

Image
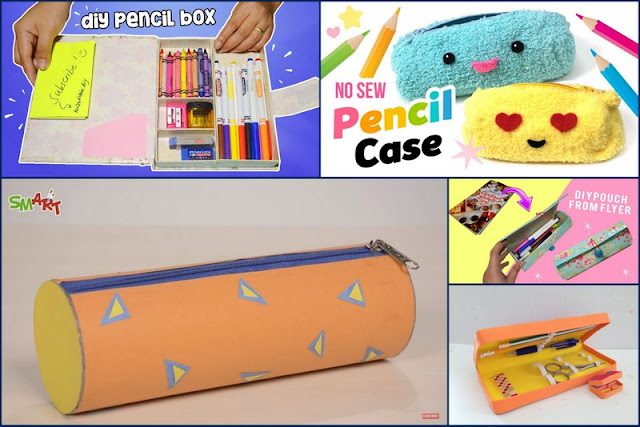
Hey Everyone, Hope you all are doing amazing today.   So are you all prepared to learn another amazing DIY craft today? Well, let’s uncover what we will be learning today. Pencil case/pouch. Every high school student, every college student and pretty much anyone, including teachers, who need to carry stationary to their workplace or a place where they study, they can make use of such crafts which will help them keep all their pens and pencils in one place. They won’t have to dig in their bags to find a pen when it is needed the most.   I enjoyed watching the video tutorials as they teach you every step in detail and helps you efficiently to make your own DIY. So let’s begin with the DIY pencil case/pouch and keep all your stationary in one place. If you want to, you can make different cases for different things. Like you make a separate one for markers, a different one for colors, a different one for pens and so on. You can even label the pouches or make them in differen

DIY Scarf/ Tie Hanger

Image
Hey Everyone, Hope you all are doing amazing today. Today’s blog is super exciting for me because I actually own one of these products, but if I had come across this DIY sooner, I wouldn’t have to spend the money that I did and would have made it all by myself at a much cheaper price than what I bought it at. It is a scarf/tie organizer. This can be a huge help for you to keep your cupboards organized and to keep your ties and your scarves, all in one place.   You can open your cupboard and see this one hanger that holds all your scarves and ties, and you can simply choose which one you need with the shirt you wish to wear, instead of digging into your drawer and making a mess out of everything.   This is a very easy DIY craft which you can make pretty easily and at a very low price. You might want to save yourself some dollars especially now when everything seems to be so expensive. Disclaimer: All the videos that will be shared on today’s blog do not belong to the

Renew Old Leather Bags, Spruce it up

Image
Hey Everyone, Hope you all are doing amazing today. Who all love hand bags? All sorts, all sizes all colors? Well I do! I love hand bags, and I wasn’t really fond of them until recently. This love for handbags also increased my interest in how handbags could be reused wisely. So here is an amazing DIY tutorial for you to spruce up your old leather bags and make them super new. They look so cool with any outfit; I think I should make something like for myself.   You know when you can make something so easily; you don’t actually have to pay huge amounts of dollars to purchase the same thing. Let’s take a look at the videos shared on today’s blog to help you learn how you can spruce up your bags to make them look new and super chic. Disclaimer: All the videos that are shared on today’s blog do not belong to the Crafty Blogger and we do not take any credit for the creativity displayed by the amazing video bloggers and their efforts should not be ignored. They have put in a l

DIY Lipstick Organizer /Stand

Image
Hey Everyone, Hope you all are doing super amazing today. Today’s blog is especially for the makeup lovers out there and who LOVE lipsticks and are not so great at organizing their lipsticks. Well do not very now as we are giving you some major organizing ideas through the videos that will be shared today.   You can make lipstick stands or cases which will help you keep all your lip colors in one place. It will make doing make up so easy for you. You won’t have to dive in your drawer of makeup to look for the right color or the lip color you love the most. You can place this in your drawer or can keep it on your dressing table so that you can see all your favorite lip colors on the stand. I loved all the ideas, I hope you do too. Disclaimer: All the videos that will be shared on today’s blog do not belong to the Crafty Blogger and we do not take any credit for the creativity displayed by the amazing video bloggers. Their efforts and ideas should be appreciated as the

DIY Sunglasses Holder

Image
Hey Everyone, Hope you all are doing amazing today. Today’s blog is going to teach you all DIY lovers how to make a stand or an organizer for sunglasses. It is basically a sun glasses holder, with different things, which can be made very easily and under a budget. You will not be spending many dollars for this DIY so don’t worry about the expenditures. And since it is so easy and cool looking, you can put it out on your dressing table or you cupboard where all you sunglasses or spectacles collection will be neatly organized in front of you. This will also save your glasses from all the scratches they would get otherwise if dumped in a drawer without any care. So if you are a messy person who would love to save their sun glasses from such scratches, you might want to continue reading and watch the videos that will help you immensely with your DIY for today. Disclaimer: All the videos that will be shared on today’s blog do not belong to the Crafty Blogger and we do not

Reusing Old Rings

Image
Hey Everyone, Hope you all are doing amazing today. Since we all here know how important it is to recycle the things we use and not waste any material for the sake of our environment. So today’s blog is yet, another amazing DIY tutorial on how you can reuse your old rings and make them super new to reduce waste for the environment and to save yourself some extra dollars which you otherwise would have wasted on buying new rings. The ideas shared on today’s blog will be very helpful for you to make your old rings as good as new by simple and very easy and less expensive methods. This is the beauty of DIY crafts; you can use anything available at home and make something so wonderful out of it at a very reasonable price. And sometimes, it is even free of any cost as pretty much everything is available at home. Disclaimer: All the videos that will be shared on today’s blog do not belong to the Crafty Blogger and we do not take any credit for the creativity displayed by th

DIY Watch

Image
HeyEveryone, Hope you all are doing super amazing today and are all set to learn another amazing DIY craft today. Today’s blog will focus on how you can make some really cool and customized watch straps for yourself. You can DIY the already existing watches that you have and reuse the dial and make something super new and something that looks super amazing. I love watches and so does my best friend.   We both have a collection of watches. Which also means that if I want to, I can do some major changes in the watches i have to make something that looks so cool like the watches shown in the videos.   You must watch all the videos shared on today’s blog as you will get so many different ideas to make watches for yourself. You can even gift these watches to your loved ones who would love a pair of customized watches made by you with so much love. Disclaimer: All the videos that will be shared on today’s blog do not belong to the Crafty Blogger and they do not belong to th

DIY Crafts with Tape

Image
Hey Everyone, Hope you all are doing super amazing today. Today’s blog is going to give you so many different ideas on how you can use duct tape and washi tape and any other type of tape to make these amazing crafts which can be used for your room décor, your personal use like a wallet or for making flowers. Tape is a very common craft resource which is usually used to keep the things together or to make them stick to each other. But today, we will learn all the different ways you can use any tape that you have access to and make these super easy and super cheap crafts. Do watch the videos shared on today’s blog. Disclaimer: All the videos that will be shared on today’s blog do not belong to the Crafty Blogger and we do not take any credit for the creativity displayed by the amazing video bloggers. Their efforts and ideas should be appreciated as they have put in a lot of hard work to make these amazing video tutorials for you to help you make your DIY craft a piece of

DIY Chain and Chain Jewelry

Image
Hey Everyone, Hope you all are doing amazing today. Today’s blog is about chains and how you can use chains so creatively. You can not only use chains for your necklaces but can also make wallet chains or bracelets with chains which look super classy. You should watch the videos shared on today’s blog as it will not only teach you what all you can make with chains but will also give you a good step by step tutorial on how you can make a chain all by yourself. You can use bronze or golden or silver wire to make these chains. It is easy and very much affordable for anyone. Yes, it does involve a little bit of hard work, but then, hard work does always pay off doesn’t it? And just look at all the options you have which you can make with chains. These are just some of the options. Disclaimer: All the videos that will be shared on today’s blog do not belong to the Crafty Blogger and we do not take any credit for the creativity displayed by the amazing video bloggers. Their

DIY Planters and Pots

Image
Hey Everyone, Hope you all are doing amazing today. Today’s blog is for all the plant lovers out there and who would love to make something for their garden. Something that looks this easy and amazing as the pictures on this blog. Well you can now make yourself some really interesting and easy DIY pots for planting. You can make them in different sizes and shapes. So don’t miss out on the different videos that I have share don the blog today. The interesting thing about today’s DIY is that you can use things as common as cement, tape, old utensils and any paper available to make these planters. They look super easy to make and are very economical for anyone who wants to keep their expenditures of DIY under a budget. Disclaimer: All the videos that will be shared on today’s blog do not belong to the Crafty Blogger and we do not take any credit for the creativity displayed by the amazing video bloggers. Their efforts and ideas must be appreciated as they have put in

DIY Table Mats

Image
Hey Everyone, Hope you all are doing amazing today. So the Crafty Blogger today has got some really interesting craft for all the DIY lovers out there. Table mats. Table mats are something used by everyone as everybody uses the dining table for any meal of the day. Even when guest come over for a lunch or dinner event, you would like to decorate the dining table with some beautiful table mats. Well, that is something that I like to do when I am expecting guests over. I mean, these little pieces of art makes the table look so beautiful. And how more beautiful would it look when the table mats are made by you yourself. And guess what, it is super easy to make these mats. You can make this with yarn, pom poms, newspaper and pretty much anything at all. So watch the videos shared on today’s blog and learn how to make this amazing DIY. Disclaimer: All the videos that will be shared on today’s blog do not belong to the Crafty Blogger and we do not take any credit for th

DIY Table and Stool

Image
Hey Everyone, Hope you all are doing super amazing today. Today’s idea that I will be talking about on my blog is very interesting and is going to be loved by you. DIY Tables and stools. Yes, you can make yourself some really cool table and stools with stuff that is easily available at home. Things like Tin, Paint tubs and cardboard is easily found in your house. You can reuse these waste materials which can be used in a very creative way to make something as cool as a DIY table or a DIY stool to sit on. It will be very nice to make something for your room or make an extra set of table chair in case you plan to go on a picnic with your family. These can be easily ported anywhere. This is what it makes this DIY super amazing. You can place it in your rooms, your drawing room or even in your garden. Disclaimer: All the videos that will be shared on today’s blog do not belong to the Crafty Blogger and we do not take any credit for the creativity displayed by the amazing v

DIY Foosball Game

Image
Hey Everyone, Hope you all are doing amazing today. Today’s DIY idea is super interesting and is going to be loved by a majority of the readers today. Now who loves foos ball? I know I do. I played it at my cousins place and was so into the game. Never got a chance to buy the big foosball table as it was very expensive. But guess what? You can make a DIY foosball table for yourself. Even though its slightly smaller in size, but you can use the same directions for a larger base. You can use a shoe box for this DIY. You would need some wrapping paper or paint, it is totally up to you how you want to cover the shoe box. If you want to make it on a slightly larger scale, you can use two shoe boxes. Or more, depending on how you like it. Disclaimer: All the videos that will be shared on today’s blog do not belong to the Crafty Blogger and we do not take any credit for the creativity displayed by the amazing video bloggers.   They must be appreciated for they have put in a l

DIY Pocket Tissue Packets

Image
Hey Everyone, Hope you all are doing amazing today. Today’s blog is going to teach you how to make a pocket tissue holder which looks super adorable and can be a good organizer for your pocket tissues. Tissues are something that pretty much everybody carries with them. And when you are in a hurry, you often just quickly pick too many tissue papers and throw them in the bag. This makes it difficult for you to find them in your bag, or even if you find them, they are not in a good condition. So it is better for you to make a pocket tissue packet which will help you keep the tissues organized in one place. Easy to find, easy to keep and easy to carry anywhere. Disclaimer: All the videos that will be used on today’s blog do not belong to the Crafty Blogger and we do not take any credit for the creativity displayed by the amazing video bloggers. Their efforts and ideas should be appreciated as they have put in a lot of hard work to make these amazing video tutorials to

DIY Fabric Painting Shirts

Image
Hey Everyone, Hope you all are doing amazing today. Today, we are going to learn how to use fabric paints and paint our lovely t-shirts or pretty much any shirt and make it different. And more lovely of course. Painted shirts look very nice. And since you can paint it yourself now, you can pretty much anything over it. You can paint your t shirt with fruits, quotes, sceneries and do some abstract as well with different color combinations. Fabric painting is very much fun. I love fabric painting. I remember how enjoyable it was when I made a few satin napkins and painted them with fabric paints, they looked lovely. You can print a pattern from the internet, copy it over the shirt and paint it. Yes, it is as simple as it sounds. Disclaimer: All the videos that will be shared on today’s blog do not belong to the Crafty Blogger and we do not take any credit for their creativity. They must be appreciated entirely for their work and efforts as they have put in a lot of har